Tooth Fairy Projects
It's always nice to know when a project you've made is remembered by someone. It's even nicer when you realize that your project made an especially happy memory for one of your own children.
I was out shopping ( OK, I confess it was fabric shopping! ) when my daughter called me on my cell phone and told me I had an additional project to stitch when I got home. My grandson had his first loose tooth and she said it was time for him to have his own tooth-quilt or tooth-pillow. I hadn't thought about these in a very long time. It did my heart good to know that something so simple to make was remembered fondly after all these years.
When my daughter and son were loosing their baby teeth the Tooth Fairy had a difficult time locating the tiny teeth under the pillow, under the sleeping child, in the dark room, and she worried about waking the child and being seen! The tooth-quilt and the tooth-pillow are both made with a small pocket on the front. When the child goes to bed, they put their lost tooth in the pocket instead of under their bed pillow. The Tooth Fairy easily finds the tooth and has the perfect place to leave the money or other treasure with little or no chance of waking the child.
My grandson was given a choice and chose a tooth-pillow! ( Seems odd I know, but remember, he has a pile of quilts and then borrows more from the rest of us when he wants to snuggle in a "quilt nest"!!! ) Both projects begin the same way and are quick and easy to make. I'm going to give you directions for both so you can choose the one that would work best for your loose toothed angel.
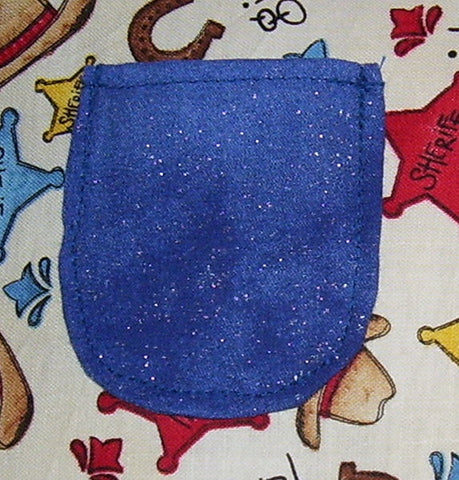
After you decide which project you are going to make, you need to choose your fabric. My grandson chose a piece of cowboy themed fabric to match his cowboy bedroom. Then he picked a piece of blue with tiny sparkles for the back and tooth pocket.
To make the tooth-pillow or the pocket block for the tooth-quilt you will begin by cutting a 12½ square of your main fabric ( for the pillow top or the quilt block ) and a 3" X 6" piece of your backing or contrasting fabric ( for the tooth pocket ).
To make the tooth pocket you will fold the 3" x 6" piece in half with the right sides together to form a 3" square. Consider the fold as the top. Round off the two bottom corners to make a U shape. Stitch using a ¼" seam and leave an opening large enough to turn right side out. Clip the curves and turn right sides out. Top stitch along the top of the pocket piece. Place where desired on the 12½" square and top stitch sides and bottom ( this will both attach the pocket, now lined, and close the opening used to turn right side out ) leaving the top open for the tooth and treasure exchange. 
Once the pocket is attached you may personalize as desired. You might wish to add embellishments such as lace, buttons, rick-rack, charms, studs or rhinestones. I used an embroidery machine to add my grandson's name. He got to spell his name on the machine and really enjoyed watching his name being stitched.
If you are making the pillow, you now need to cut a 12½" square piece of backing or contrasting fabric and place it on the pillow top with the right sides together. Using a ½" seam allowance, stitch around all four sides leaving a 3" opening on one side for turning right side out and stuffing. Clip the corners. Turn right sides out. Stuff with your favorite filling ( batting scraps from previous quilt projects work great ). **My grandson had a ball stuffing his own pillow!!**
Finally, you can turn under the edges of the opening and top stitch ¼" around the entire pillow. This will close the opening and finish the pillow.
My little guy was so proud he was able to help. He ran to show his mom the finished project and is constantly wiggling his tooth to encourage it to fall out so he can try out the pillow on the Tooth Fairy!!!
If you are making the quilt, you will now cut five more {eleven more for a larger quilt } 12½" square blocks from the fabric(s) of your choice and enough 3" wide strips to use as sashing between blocks. Create your quilt top with three rows of two blocks { or four rows of three blocks for the larger quilt } and the contrasting sashing. I suggest placing the pocket block in the top row. Add one or more borders if desired. Make your quilt sandwich ( backing, batting, and the quilt top ), quilt or take to your favorite long-arm quilter, and bind.
Now wait for that tooth to fall out and enjoy!! The Tooth Fairy will thank you  .
.
If you have any questions, please contact me.
Happy quilting,
Laurel